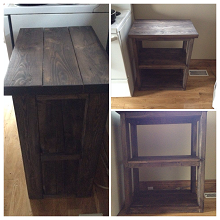
DIY Rustic Microwave Stand - General Purpose Stand

With the left over pieces from building our new Rustic
Coffee Table, I decided to get rid of our old beat up press board Microwave
stand and build a new one for the kitchen.
Between the two projects (with the purchase of a few extra 2x2's and
screws), you can build both of these for less than $120. They are basically the same design, just
modified to fit the individual circumstance.
If you decide to build this stand on its own, you will need the following:
If you decide to build this stand on its own, you will need the following:
|
Wood
1 - 2x6 2 - 2x4's 3 - 2x2's 2 -1x2's 1 - 1x6 Cut list 2x6 - (3 X 26") - Stand Top 2x4 - (4 X 30") - Stand Legs 2x2 - (6 X 21") - Side Shelf Framing 2x2 - (6 X 7 1/2") - End Shelf Framing 2x2 - (3 X 11 1/2") - Centre Shelf Support 1x2 - (4 X 21") - Shelf Edging - see picture 1x2 - (2 X 24") - Centre of Shelf- see picture 1x6 - (4 X 21") - Shelves |
Tools/Other Materials
2" wood screws 2 1/2" wood screws Saw (any of Table Saw, Mitre Saw, Circular Saw or Hand Saw will do) Drill Pocket Hole Driller (optional) Wood Putty Sander - (A Corner Cat electric sander is handy and a good investment if you are planning on doing a number of these projects. But you can hand sand it was well. It will just take a long time and a lot of effort) 80 grit and 220 grit sandpaper Wood Sealer Stain |
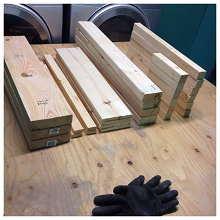
Once I had
all of my pieces cut, I ventured into my Laundry Room Workshop (trust me, the
rest of my house looks much nicer then what you see in the photos).
Instructions
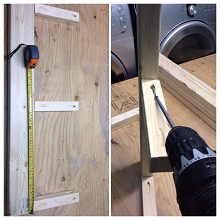
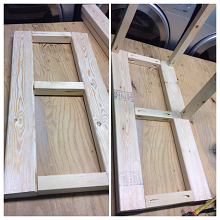
First,
layout your pieces for your end framing so you know everything is in line and
is the same length. These will be your 7
1/2" 2x2's and 30" 2x4's. Make
sure the spacing between the shelf supports is equal (per tap measure
photo). Once everything is in line
attach your pieces together.
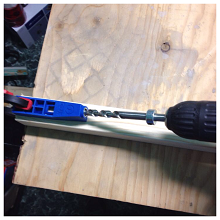
You can use pocket holes as per the photo (which you will of course have to pre drill), but you can also just screw the pieces together through the ends. Pocket holes will be much easier however as you would need, at a minimum, 4" screws to drill length wise through the 2x4's
Once your
end pieces are built, attach your Side Shelf Support framing pieces. You will use your 21" 2x2's here. Again, lay it out first to make sure
everything is in line so you have a level shelf.
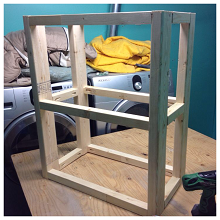
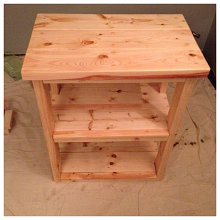
Once you
have your end pieces connected by your Side Shelf Support, take the 11 1/2"
2x2's and screw them in the centre of each shelf to provide your Centre Shelf
Support. Once that's completed you
should have a frame that looks like the photo.
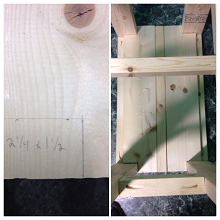
Time now to
attach your shelves. Cut a 2 1/4"
by 1 1/2" piece out of each end of your 1x6's. This is to fit around your shelf legs. Don't worry if they don't come out flush with
the Side Shelf Support. This is where
your 1x2 Shelf Edging comes into play in a moment. Once you have these pieces cut and put in
place, you should have a 1 1/2" gap, which you will fill with you 21"
Centre of Shelf 1x2. Use the 2"
screws to attach these pieces to your framing.
Remember, always start building your shelves from the bottom.
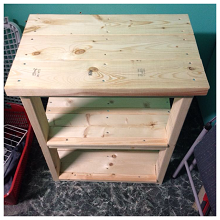
Attach your
second shelf then evenly space out your 2x6's for your Stand Top (there should be a 1" overhang on each
side). Attach your top using the 2 1/2
Screws. Then attach your 1x2 Shelf
Edging to each side and you've completed your stand.
Next, fill
your pocket holes and screw holes with Wood Putty. Allow to dry for at least 2 hours, or
whatever the manufacturer specifications are.
Sanding is almost always the most labour intensive part of any wood working project. Sand the entire stand with 80 grit first to take off any rough pieces and remove any manufacturer stamps that may be on the wood. Then sand again the visible parts with 220 grit.
Grab a paint brush and apply a wood sealer to the entire piece to protect it as you are using soft wood. Allow it to dry for at least 1/2 hour or until it doesn't feel tacky. Then you are ready to stain.

Staining
techniques vary, but to do this I used a paper towel to spread out the
stain. You can use a sponge too if you
like. Dab some stain on the wood then
spread it with your paper towel/sponge.
Start with a small non visible area first to get an idea of how much stain you will need to
use.
Once it's dry, you're finished.
Have fun putting this together. The best suggestion I can ever make is to have patience. And don't get discouraged. The point of DIY is to give things a try and see what happens.
Once it's dry, you're finished.
Have fun putting this together. The best suggestion I can ever make is to have patience. And don't get discouraged. The point of DIY is to give things a try and see what happens.