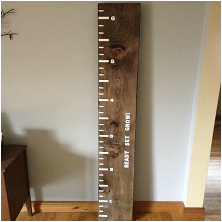
Wall Ruler

This is another project (along with the Scrabble blocks) my
wife and I did for our friends who just had their first child. It's a fun little piece to hang on a wall and
they can track their child's height as they grow. I like things that have a decorative but
functional purpose.
If you would like to do this project you will need the following;
If you would like to do this project you will need the following;
|
Materials
1 - 1X10 6 feet long (Most building stores have pine shelving this length/style which will work great) Wood Sealer Stain Stencil (3 inch letters) Paint Wall Hangers |
Tools
Sander (hand sander will work but investing in a Corner Cat style electric sander will definitely speed up the process) Foam paint brush (for letters) Paint brush (for stain and Wood Sealer) Level |
Your numbers on this board will start at the 6 inch
mark. So to hang this it will have to be
6 inch's off the ground. Assuming
whoever you are making it for won't have children taller than 6'6", you
should be fine.
To start, sand the entire board front and back. Use a 80 grit first to smooth out the sharp edges and knots. Then use a 220 grit to smooth the board.
Apply the Wood Sealer to protect the wood and let dry. This shouldn't take more than an hour.
Next, stain the board with your desired tint. I went darker because I had this stain left over from other projects. Plus we wanted to use white letters on it. The stain I used is called Expresso, but whatever your desired shade will do. Techniques for staining vary, but for this board I dabbed some stain at the top using a paint brush then spread it the length of the board with a paper towel. You can use a sponge if you like.
Once your stain is dry, it's time to put on the letters. Each one of the marks on our board is 2" apart as I felt one inch increments looked too cluttered. Each of the longer lines is at a 6" mark. They sort of act as accomplishment points. Feel free to make tiny marks on the board with a pencil to make sure you are lining it up properly. Use the level to make sure your lines are straight. I had some issues with this as I have big clumsy hands. But thankfully, by using a water based paint, I was able to clean up any errors I made or completely wipe off letters if I did them wrong with the stencil.
We also choose to write the very clever "Ready, Set, Grow" on the side, but you can do whatever you choose.
Once your paint is dry your finished. You know have a unique handmade gift for someone that they will use for years. Have patience and have fun.